
I had been keen to make a smart jacket to wear on cooler summer days for a while, but hadn’t thought that my skills were quite ready for that challenge. Then I realised that I’d probably never do it, unless I just jumped in and had a go – that’s pretty much what happened with my first blouse. I had already been browsing some jackets and coats in shops online and started to create a Summer Jacket Pinterest board to track the items I was drawn to. I quickly refined my vision to a tweed jacket and found I had a suitable pattern in my collection that I hadn’t used yet (Burda Misses Jacket and Skirt 7135). I’d picked it up on sale with the intention that one day I’d feel brave enough to attempt a suit for work. The shorter jacket (view A) with welt pockets looked very similar to those on my Pinterest board, so I didn’t even have to pick up a new pattern.
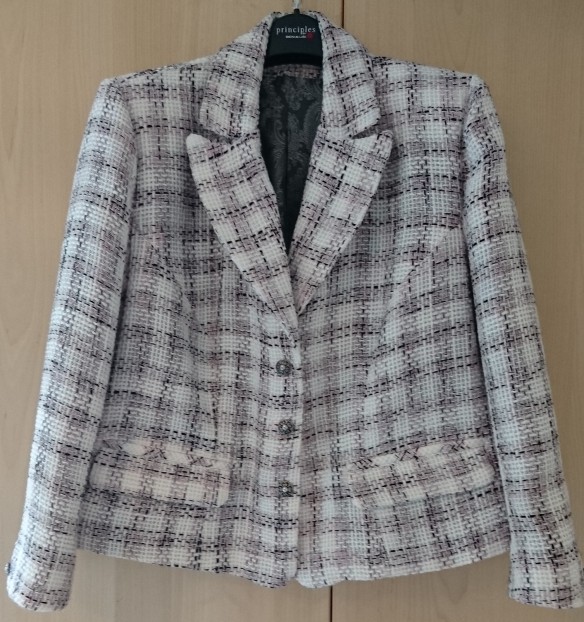
My main fabric choice was a pink, black and cream tweed check, and I lined it with a silver paisley weave jacquard, both from Minerva Crafts, then added some metal filigree buttons in antique silver, which I knew were the buttons I wanted from the moment I saw them. These all complemented each other perfectly for this project, although many times during the sewing I wished I’d chosen a different outer fabric. The tweed was quite a loose weave, and made the finer details (like the welt pockets and sleeve vents) very fiddly, as it frayed so easily. I’m really pleased with the end result though, and it was definitely worth any pain.


I made a very basic toile with only one sleeve – mainly to check the jacket and sleeve length. The jacket length was great, but I took an inch and a half out of the sleeve. I’ve always had trouble with sleeve length in RTW (ready to wear) clothes, so it was a great treat to make them to fit my shorter arm length.
There were quite a few elements in this jacket that were new to me, but I took each one slowly and was blown away with how well it all went.
- I decided to make my marks with tailor’s tacks for the first time, which worked even with the loose weave fabric. It would’ve been impossible to mark this fabric any other way – pins dropped out when I tried them, and chalk barely left a mark.
- The welt pockets frayed like mad, and I thought that I’d fallen at the first hurdle. With a few extra stitches, however, to hold things firmly in place, they came together better than I ever hoped.
- Lapels of any type are new to me, and these peaked lapels really had me confused when I first looked at the instructions. Nevertheless, once I’d sewn the darts in place on the front body pieces and followed the instructions a step at a time, they came together without too much difficulty.
- There was a lot of hand-basting needed, and although I’d done this before I hadn’t needed to do quite this much or use it to shape elements like lapels. I found this quite a meditative activity, as well as the hand stitching at the jacket and sleeve hems. I have learned the value of basting, and I think I’ll use it more often when I’m aiming for high quality in my sewing.
- I really enjoyed putting together the lining of the jacket, as I was able to let rip on the sewing machine, although initially I was very confused by the stitching at the centre back of the lining. I couldn’t figure it out at all, so I just stitched it as described, expecting to need to unpick it and try again. I had a big ‘a-ha’ moment, however, when I realised it created a very neat pleat to allow room across the back when moving your arms, which avoids pulling the jacket out of shape or tearing the lining fabric.
 I really love this jacket, but I’m not sure if I’ll dare wear it out and about for fear of damaging it. This was my biggest challenge and my biggest success to date. It’s too hot to wear it here right now, so I have some time to get over my fear, and just enjoy it.
Do you ever feel worried about wearing your hand made clothes in case of damage? How do you get past it?
Jx
