Electric Piano Cover

A couple of weeks ago, I tried adjusting some t-shirts that were too long for Jez, but it was a bit of a disaster.  The t-shirts had been bought before we moved, and since then we have both managed to loose quite a bit of weight.  Yay!

Unfortunately, this meant that the shortened t-shirts looked ridiculous.  I threw them back in the wardrobe to use the fabric for something else.  I’m now considering deconstructing them and rebuilding them in a smaller size, retaining the neck band if I can.  But that’s for another day.

Today, I completed my first successful sewing project in a long time, and I only started it yesterday.  I had some leftover fabric that I thought would make a good cover for my electric piano.  It came from some Ikea curtains I had shortened for my office.  Up until now I’ve just been using some cheap yellow and white spotted fabric that I impulse bought years ago to keep the dust off my piano.  It often slides off, and is a bit of an eyesore in the music room.

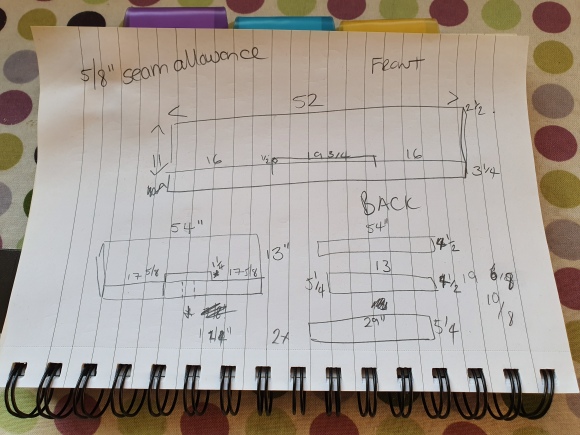
Yesterday, I started taking measurements and working out how to construct the cover.  I wanted to create something that would:

  • be easy to put on and take off,
  • fit around the attached music stand, and
  • not slide off.

Here are my doodlings:

I cut out the pattern pieces last night, although I wasn’t entirely sure how I was going to fasten the cover at the back.  I thought probably with Velcro, which I would have to order, but I thought I’d wait until I got to that bit to work it out.

This morning I started piecing it all together, and didn’t have any problems.  It all went together nicely and fit as I intended.

In the end, after chatting with Jez about it, I decided I would go for a Velcro fastening.  I’ve ordered some which should arrive on Monday.  In the meantime, the cover still does it’s job and I’ve just pinned it together with some fabric clips for now.

I particularly enjoy constructing covers from object measurements.  I’ve had two other examples of this with the Guitar and Bass Amp Covers and the Chair Cover for Cape Beauty, and they came together better than I had expected on both occasions.

It looks like I have the sewing and blogging bug back.  Hooray!

Black and Red Stripy T-Shirts

I have spent a couple of months searching the internet for red and black striped knit fabric – one to one and half inch horizontal stripes – with no success.  I wouldn’t have thought it would be such an impossible fabric to find.  My last resort was to have it specially printed, although this seemed like a lot of work to go to for such a simple pattern.

T-Shirt 1I started with ‘Spoonflower’ which appears to be the front runner for printing your own fabrics.  It was simple enough to create the design and upload it, but I had to buy 2 yards, as I needed just over 1 metre for the t-shirt and you have to buy to the nearest full yard.  Then there was international postage costs to the UK, and I was hit with a tax charge when I picked it up at the sorting office.  They were unable to deliver it directly due to this additional charge. This is definitely the most expensive fabric I had ever bought.  All included it came to approx. £60.  The fabric was a thin jersey, but it was okay for the t-shirt.  The red came out a little brighter than I expected, but that’s hard to account for without ordering colour samples first.

T-shirt 2After receiving this fabric and needing to pay the extra tax charge, I thought I’d look into UK based alternatives.  I tried out ‘Bags of Love’ and I was very impressed. It took me a little time to figure out how to upload and order the fabric I wanted, but you can order an exact size of fabric required (length and width), which helps to keep the costs down.  I ordered the medium weight jersey and it was a lovely fabric. From my experience with the colours of the Spoonflower fabric I darkened the red stripe, and it came out exactly as I wanted.  The cost of fabric and delivery came to approx. £45, so it was quite a lot cheaper than Spoonflower. Since I’d ordered the exact size of fabric I wanted, there were no fabric remnants left, which was great.  I’d only end up hoarding them, and what can you do with small amounts of jersey fabric?

Here are photos of the two t-shirts made using Simplicity 2116 again, like the Black and Beige T-Shirt.  The construction was very similar to the first one, except this time I made sure I put the neck band in the right way around first time.   Jez and I are very happy with both t-shirts and I’ll definitely use ‘Bags of Love’ should I need/want fabric printing again.

Jx

Black and Beige Stripy T-Shirt

B&W T-shirtAfter my success with his Monkee’s shirt, my boyfriend asked if I could make him a stripy t-shirt.  He’s quite particular about his stripes and hasn’t been able to find any t-shirts he likes for a while.

I wasn’t sure about making something as classic as a t-shirt, but thought I’d give it a go.  I ordered some black and beige stripy knit fabric from Minerva Crafts and I was very pleased with the feel of it when it arrived.  The pattern I picked for this was actually a pyjama top pattern which looked like it would be simple to make (Simplicity 2116).

The cutting out took quite a while as I tried to make sure that the stripes matched on the folded fabric.  The stripe matching along the sides worked out well in the end – not perfect, but good enough.

The big problem I had was with the ribbed collar.  I used my overlocker for all the seams including the collar, and as I was sewing it felt like it was going in beautifully.  I’d never done this before, but I was following some advice I’d found online about stretching the ribbed fabric as I sewed it in, after lots of pinning to make sure it was evenly distributed around the neckline.  As I looked at the completed neck band, which was lying beautifully flat with no puckers, I realised that I’d sewn it in inside out! Bugger! I managed to keep calm and after unpicking it, which took ages with the overlocking, I sewed it in again the other way around.  Not quite as good as the first time, but good enough.

In the end, Jez was really pleased with it and has set me the task of finding some red and black fabric to make him a Dennis the Menace style t-shirt (or two).

Jx

Red Monkee’s Shirt

monkeesMy boyfriend is an amazing musician who loves the music of the 1960s, as well as many other genres.  He has always wanted a Monkee’s shirt, but has never been able to find one.  I’ve googled for them and they are really hard to find.  There are some hand-made ones available online, but they are very expensive and tend to ship to the US only …so I decided to have a go myself.

Jez wanted to be involved in the design process to ensure that it was a close as possible to the originals.  He found me some photos online and stills from his Monkee’s DVDs, so we could look at the shirts in detail.  We quickly noticed that there seemed to be several styles of shirts.  Some had the button up fronts, while others were worn open, and there were several lengths.  The key features were the eight button front bib, three button cuffs and square bottom hem with side splits.  We took our time finding just the right buttons for both the front and the cuff.Monkee's Shirt

The original Monkee’s shirts were designed by Gene Ashman, and as they were inspired by the shirt John Wayne wore in many of his movies, a western shirt seemed like a good place to start.  I used the Eagles View Western Bib Shirt and cut out size XL.  I made a very quick toile, for fitting and to test the making of the v-neck, collar and the sleeve cuffs – I’d never made sleeve cuffs before.  Then, I just worked my way through the instructions on the pattern for everything except for the bib. I simply sewed together two rectangles of fabric for the bib, after completing the rest of the shirt, so we could judge the correct size more easily.

Monkee's Shirt (in action)The fabric I used was a red twill, and the thickness made turning the collar and cuffs out and getting sharp corners quite difficult.  When I was creating the button holes on the cuffs I realised that I should have removed more thickness from the seams, as I had quite a bit of trouble getting the automatic buttonhole foot to work correctly due to the fabric bulk.  I’ll note that for future and probably use thinner fabric too, although this shirt will be really hard-wearing and last a long time.  We were both pleased with the results in the end, but I think I’ll wait a little while before I make another.

How many Monkee’s shirts does one musician need?

Jx

Red Knit T-Shirt

Red T-ShirtDo you remember the Purple and Green Scribble T-Shirt that I made back in September 2014?  I have finally returned to this pattern and attempted to adjust it to create a more flattering t-shirt.  It might even be something that I’d dare to wear out of the house.

I had some red knit fabric in my stash that I thought I could use for this.  It was a little thinner than I’d have liked, but it was ok for another wearable toile.

I tried on the Purple and Green Scribble T-Shirt and pinned away the gaping at the arm holes and the neck line.  Then I adjusted the pattern pieces to be closer to these shapes and added some extra length.

I quickly whizzed it together with my overlocker and did some double needled hemming on my sewing machine.  Ta da!  I have another t-shirt that will never venture out of the house.  It is better than the previous one, but still not good enough for public display.  The fabric was slippery to sew and the neck line has ended up a bit skewed.

I think I’ve learned my lesson for now.  I should stick with patterns drafted by people who know what they are doing …for now anyway!

Jx

Purple and Green Scribble T-Shirt

Purple Scribble T-ShirtWhile I was in the mood for night wear, I decided to try copying a pyjama top that I find very comfy and flattering which was starting to wear out.  I had a lovely t-shirt fabric from Abakhan’s in Manchester sitting in my stash, which would be perfect for this pattern.  I was hoping to end up with a t-shirt, that I could throw on with my jeans for a casual look.

I drew around the t-shirt/pyjama top onto some large sheets of tissue paper to create my pattern and then used this to cut out my fabric.  This is where my big mistake happened – no seam allowances!    The main issues were that it was much shorter than I would usually wear a t-shirt, the neck line either gaped at the front or pulled tight as it sat off one shoulder, and there was gaping at the arm holes.  The resulting t-shirt was tighter than intended, which actually improved it, as the original top was just a little too roomy for outside wear.  This is not an item of clothing I would wear out of the house, but it was an interesting experiment in copying clothing and an experience that will hopefully prevent me forgetting seam allowances next time.

I may come back to this pattern in the future and see if I can adjust it to make it more wearable.

Jx